
It’s become a necessary skill of the aspiring designer to bear responsive web pages in mind. 50% of all web traffic comes from mobile devices. This isn’t something that can be ignored. Responsive designs are a requirement for websites now. With that having been said let’s look at some of the best practices regarding responsive […]
20 Best Marketing Guides on the Web
The Internet is complex, especially when you start marketing on it. To help you along, we’ve decided to identify the 20 best marketing guides on the web. Hope these help you navigate the World Wide Web. #1: 16 Top Tips from Blogging Experts for Beginners Content is King! A blog is not going to be […]
Top 20 Places to Find Free Images for Your Site
Do you struggle with taking good, quality images for your website or blog? The truth is many webmasters are not moonlighting as professional photographers, taking awesome pictures for their site. They instead rely on stock images that are available online. If you are wondering where you can find some of the best images for your […]
How to Get More Leads on LinkedIn
Are you using your LinkedIn profile to its fullest potential? Instead of using it to list all of your experience and past accomplishments, optimize it to reflect your fullest potential and start reeling in prospective leads. Here are five ways to utilize your profile to attract new business contacts: 1. Emphasize your value. When potential […]
How to Manage Your Online Reputation
In the business world, your reputation can make or break your success. If you have a bad reputation, very few people are going to want to do business with you. The same goes for your online presence. If you have a brand online, you need to work hard to maintain a good reputation so you […]

13 Best WordPress Newsletters
With A Day of Rest coming up in just a few months, the world of WordPress is expected to undergo quite a bit of change. Even WordPress co-founder, Matt Mullenweg, can hardly contain his excitement about the upcoming conference and update to WordPress’s API. The next generation of the platform has him expecting a “wide […]

Three Trends that Define Elite WordPress Users
Earlier this year it was projected that in the coming months, if not already, WordPress would break the 50% market share threshold. It’s a monumental achievement for what first launched as a blogging tool, but has since evolved into a powerful content management system that powers sites like TechCrunch and Google Ventures. To support the […]
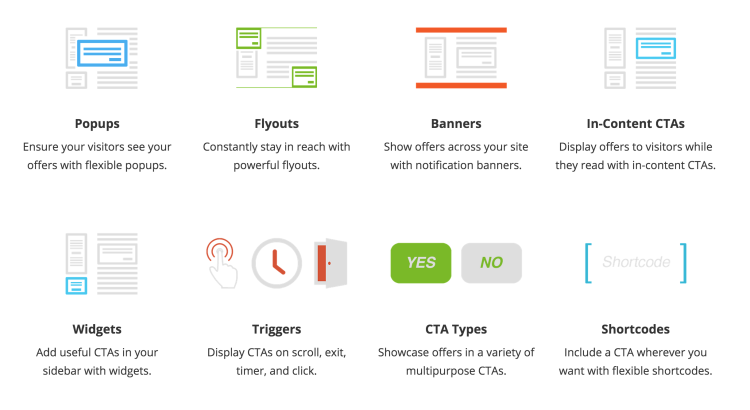
Optin Fire
The Optin Fire plugin for WordPress is the easiest way to add and manage popups, banners, flyouts, in-post content CTAs, and widget opt-ins on your website. Optin Fire makes it simple and easy to grow your email subscriber list. The plugin features 5 different Optin types to showcase 9 different CTAs in 7 templates. Optins can be triggered on […]
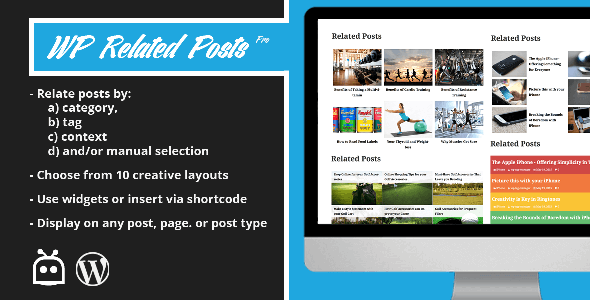
Post Relate Pro
Do you want to make sure your related posts are easily seen on your blog? Post Relate Pro is the most extensive plugin on the market for displaying your blog’s most related posts. Use Posts Relate Pro to create beautiful in post content or widgets on your site showcasing your most related posts. Choose Between 10 Layouts Inline […]
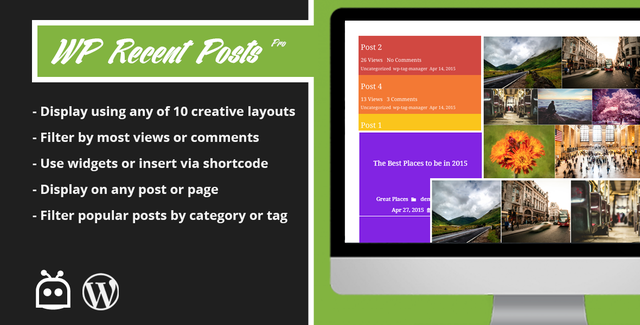
Recent Posts Pro
Do you want to make sure your recent posts are easily seen on your blog? Recent Posts Pro is the most extensive plugin on the market for displaying your blog’s recent posts. Use Recent Posts Pro to create beautiful widgets on your site showcasing your recent posts. You can also use Recent Posts Pro almost anywhere on your site by adding as […]