You probably read about Google Fonts or saw some other site using unique fonts and now have the urge to play with them.
Most likely, you are using WordPress, and since your theme was developed by some third party developer, you’re wondering how to add Google fonts to your WordPress site, heh?
Well don’t fret, it’s actually quite simple even for beginners. So let’s begin:
Identify the Perfect Google Web Font
Picking a font can actually be fun. Though, if you’re a typography or web design nut, it can get quite annoying as well.
To begin the process, head over to Google Web Fonts and browse their selection of hundreds of fonts. You can filter by thickness, slant, and width, and some fonts contain several styles.
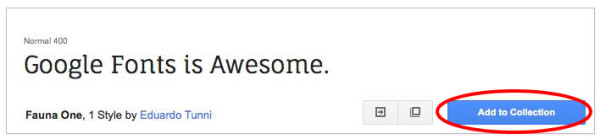
When you find a font that meets your needs, just click the Add to Collection button. This will add that font into a selection cart until you’re finished making selections. You can add another font if you desire, but remember not to go overboard.
Generate the Code for Use
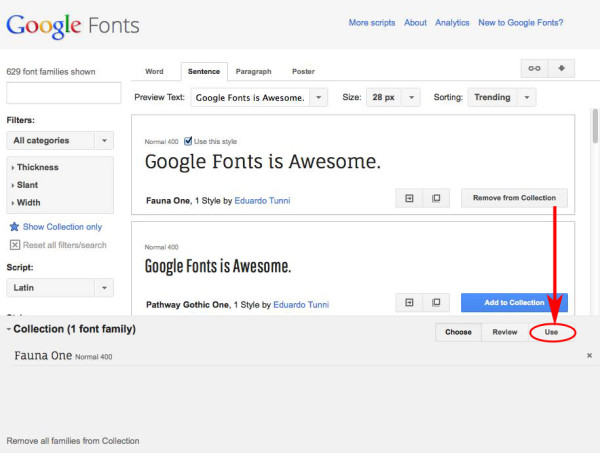
Once you’ve made your selections, the font(s) will be displayed in the bottom section of the site. It will look like this screenshot below.
When ready, click on the link labeled “Use” which will take you to a new page. At the next page, scroll down to step #3 titled: Add this code to your website: As instructed, copy the code (CTRL+C or CMD+C). Pay attention to the example in Step #4 as we’ll use that later in our CSS files.
Integrate Google Font into WordPress Theme
Now that you have the code copied, we need to let your theme know to load the Google font.
Depending on how you edit your files (FTP or WP Editor), your method to navigating to theme files may be different, however the end result is the same. For purposes of this tutorial which is intended for beginners or non-technical folks, I’ll use the WP Editor.
1. Navigate to your WordPress Dashboard – click on Appearance – and then click on Editor.
2. On the right hand side, click on the file named header.php. This is the file that loads your header, and we need to add the code into it.
3. Within header.php file, there will be existing code. Find the first instance of code that makes reference to a stylesheet. It will look similar to the line below, but not necessarily exact:
<link rel="stylesheet" type="text/css" media="all" href="<?php bloginfo('stylesheet_url'); ?>" />
4. Directly above that line, paste the code you copied from the Google fonts website. We’re placing it above the stylesheet so that the font loads first which is what Google recommends.
5. Click Update File button at the bottom when completed.
Integrate Google Fonts into CSS
Now that the theme knows which font to load, we can to use it on our site for styling. To do this, simply add the font to any CSS element you desire.
For example, the font-family property can be used in your CSS to style a specific element. The last section of the Google font page provides this syntax for you as well.
h1{ font-family: 'Fauna One', serif;}
Google Fonts in WordPress
Now that you have integrated Google Fonts into your WordPress theme, style away but don’t go overboard. Using 1 (maybe 2) fonts should be sufficient for most sites.
I do not recommend more than that on a site. If you do decide to use Google Fonts, let me know what fonts you are using in the comments below? Having trouble finding a good font, check out my best Google Fonts?
p.s. I know there are plugins out there that can make embedding Google Fonts into your site easier, however I dislike plugins especially when the alternative is so easy. After all, don’t you already have too many plugins on your WordPress site?