
I recently covered the first steps that you should take after installing WordPress, and while those should get you up and running without any problems, there is an additional step that will benefit every site. Install a Cache Plugin! I’ve heard many website owners complaint about issues related to site speed. A cache plugin such as WP Super Cache is essential to improving your sites load time. After all, this can become an issue as traffic on your website rises over time, and eventually you’re going to want be able to generate static html files to improve your site’s speed. For those that are new to this concept, let’s briefly review what cache is and why it’s important.
What is Cache?
When a user visits your site, the process of loading the page requires certain information to be retrieved from the server such as:
- data from the database (example: your article’s text)
- images
- javascript and css files
- any additional files required to render elements on the page (video, social network buttons, etc.)
As you can see, this could turn into a large retrieval process. This server process greatly impacts your page speed and load time. Now, take into account that your site is doing this for EVERY page viewed by a visitor – again and again.
A caching plugin will tackle this issue by generating static versions of your content and delivering it to visitors. Given that most of your content will remain unchanged, serving static files is worthwhile. By doing this, the page’s load time is much quicker as the entire retrieval process does not have to be repeated over and over. In some cases, the speed improvements are ten-fold, but at the very least, caching will improve a site’s performance. Here’s what the WordPress codex has to say about caching:
WordPress caching is the fastest way to improve performance. If your site is getting hit right now install W3 Total Cache or WP Super Cache. Caching Plugins. Plugins like W3 Total Cache (step by step installation) or WP Super Cache can be easily installed and will cache your WordPress posts and pages as static files.
WP Super Cache Plugin…
One of the easiest ways to enable caching on your site is to use the WP Super Cache Plugin. The alternative would be to use the robust W3 Total Cache plugin which is covered in a separate article. Though, I’ve found that those are who not overly technical prefer WP Super Cache for its ease of use.
The plugin delivers static files to almost 99% of your visitors by utilizing three methods (in sequential order):
- mod rewrite
- PHP
- Legacy caching
I won’t go over the technical details of each method as they are explained on the plugin’s repository page.
The plugin is easy to configure simply by enabling caching through the Easy tab. Thereafter, the plugin will begin to cache your pages.
So how does the WP Super Cache plugin do this?
This plugin is a caching engine that generates static HTML files of your dynamic website pages, and serves those files to the viewer instead of bulkier PHP scripts. But, there are limitations. Static files will be received by users who are not logged in on your website, have never placed comments or viewed a password protected post. Previous actions will alter the page code because the user’s details must be displayed in the content form. This means that some users might download an outdated page for a few seconds until the new static page is generated after certain number of visitors have seen the page. This shortcoming is minor compared to the massive benefits reaped.
Installing WP Super Cache Plugin
Once you’ve installed and activated WP Super Cache, you’ll see a notification “WP Super Cache is disabled. Please go to the plugin admin page to enable caching”. Follow the instruction and click through to the “plugin admin page” link.

At the admin page, select the option labeled “Caching on”, and click the “Update status” button. You could stop here if you wanted to avoid configuring any additional options and the plugin will work just fine. However, if you’d like to continue forward with a few advanced options, then proceed to the next step.

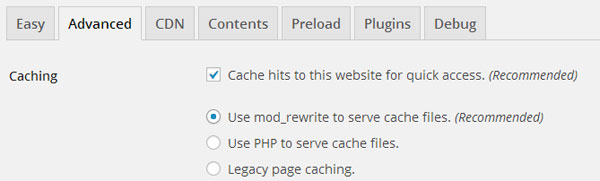
Click on the Advanced tab and enable the “Use mod rewrite to server cache files” radio button, scroll down the page and click on the “Update status” button. At the top of the page, a notification will appear notifying you that “Rewrite rules must be updated”. To do that, go to the next step.
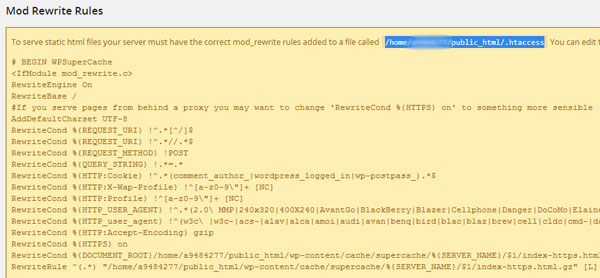
Scroll down the page to the yellow “Mod Rewrite Rules” textbox, and read the top line of the text that notifies you where to paste the code. The instructions will direct you to your .htaccess file of your website. Select the entire code snippet beginnging with: # Begin WPSuperCache line all the way down to “Rules must be added to ...htaccess”.
Using your FTP client, navigate to the .htaccess file, right click on it and select the “Edit” option. Note that you must open the file in a text editor such as NotePad++ for PC users or TextWrangler for Mac users. The file will look similar to the screenshot below.
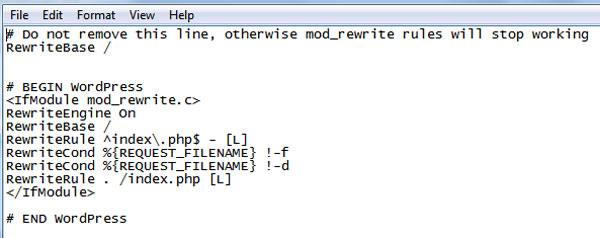
Be sure to paste the copied text right before the “# BEGIN WordPress” line. Save the file and go back to your WordPress, and press the “Update Mod_Rewrite Rules” button at the bottom of the textbox where you copied the code.

After you press the button, the textbox will turn green, meaning that you have completed the process correctly. Scroll down the textbox and tweak the “Expiry Time & Garbage Collection” settings. Be sure to set the “Cache timeout” option to “3600 seconds”, and click the “Change Expiration” button.
Finally, scroll to the top of the page, and click the “Dismiss” button if “Garbage collection is not scheduled” appears.
And you’re done! Now that you know how to install the WP Super Cache plugin, your visitors will hopefully be experiencing a faster site and page load times. Try this plugin and share your experience with us below!