
Marketing requires measuring. There’s no better way to know how your website is doing than to monitor your Google Analytics.
The greater the number of visits, the better. But, it’s just a number. If you want to continue to increase traffic to your website, focus more on understanding your visitors, their search queries and what they are reading.
This is fundamental in determining your ongoing content strategy. However, first things’ first – you cam here to learn how to setup Google Analytics.

How to Setup Google Analytics in WordPress
It’s not a hard task to get Google Analytics work for you, but first you’ll need to have a Google account.
If you already have a Google account, and you’re signed in to it, then you’ll need to visit Google Analytics website and hit the Access Google Analytics button, that will lead you to a Sign Up page where you need to enter your Google account username and password.
When you’re in, you’ll need to create your Google Analytics (GA) account by following a few simple steps.
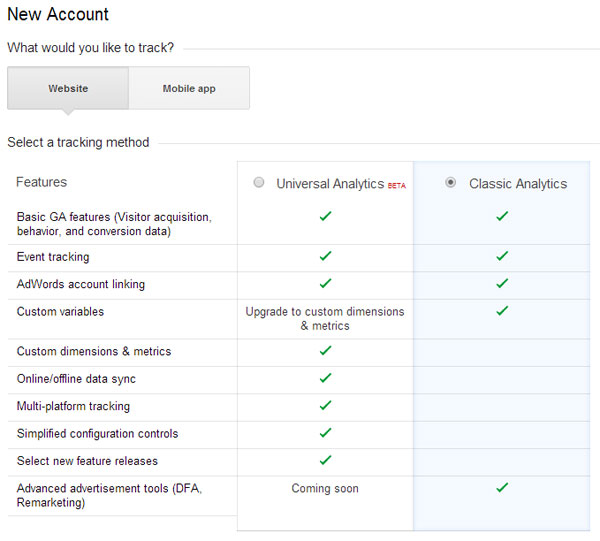
1) GA offers you two options:, track your website or your mobile app. Since you’re likely tracking your WordPress website, select Website. After that, from the “Select tracking method” section, select Universal or Classic Analytics. Specific features of both methods are listed, and choose the one that best fits your needs.
I recommend Universal Analytics – don’t let the word ‘BETA’ fool you as almost everything Google does is in BETA for eternity (so it seems).
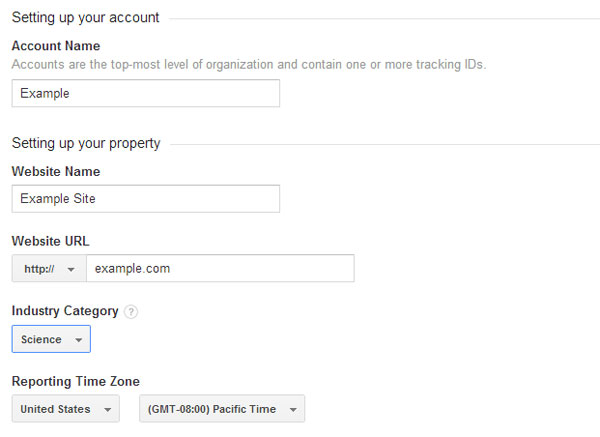
2) Scroll down the page and fill in the text boxes to setup your account:
- Account Name – Choose any name that helps you organize your site(s). This becomes especially useful once you have a dozen or so sites to monitor. For example, I may want to have my clients’ 10 sites under 1 account and my personal sites under another account name. It’s strictly for organizational purposes.
- Website name and your website URL. Note that left of the URL textbox, the dropdown menu is set to http://, however you may choose https:// if you are running an e-commerce website. Though, for most sites, the default should suffice.
- Industry Category dropdown menu offers a wide variety of categories. Select the one that best describes your website.
- Reporting Time Zone features two dropdown menus. In the left one, select the country where you live. On the top of the dropdown menu list there is a search box that you may use to type the name of your country and find it easier then to scroll down the menu listing. From the right dropdown menu, select the time zone you’re in. For countries that are in one time zone, it will be assigned automatically with the selection of the country. However, if you live in country that has two or more time zones, you’ll need to select the one you live in. This is actually quite important because you want your analytics to display the correct hour traffic was received (would hate to be off by 1 hour).
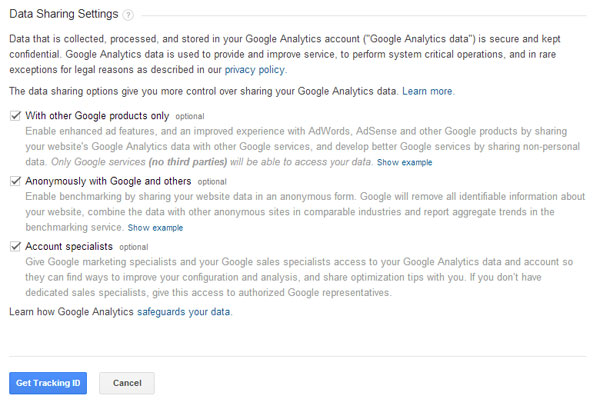
3) Next, Data Sharing Settings gives you options to share your GA data. I typically uncheck all of these, but there’s no harm in leaving the checkboxes as-is, and continuing forward by pressing “Get Tracking ID button” at the bottom of the page.
The button will activate GA Terms of Service Agreement, which you must accept in order to continue. In the dropdown menu of the window, you may select the country where you live in, and read the Agreement that applies to your country.
4) Next, Google Analytics will lead you to the “Tracking Info” section of the Admin tab. There you’ll find your Tracking ID and additional settings for Subdomains, Multiple top-level domains, Advertiser support and Custom campaign tags. Underneath these settings, you’ll find your tracking code. This is the code you need to apply on your website in order to enable tracking within your GA account, (e.g. to be able to start collecting data on your site). There are 2 methods to setup the Google Analytics tracking code:
![]()
Manually Enter Tracking Code on Your Site
Copy the entire tracking code and paste the code on every page you want to track, right before the </head> tag.
If your website has a header.html or header.php file, you will find this snippet within that file, and it will automatically load on each page. Obviously, this seems like a risky approach for novices, so let’s consider an alternative.
But when you use WordPress, it’s much easier, because you may find awesome plugins that will do a great job for you, and that will offer you much more valuable options than Google would offer to you in the first place.
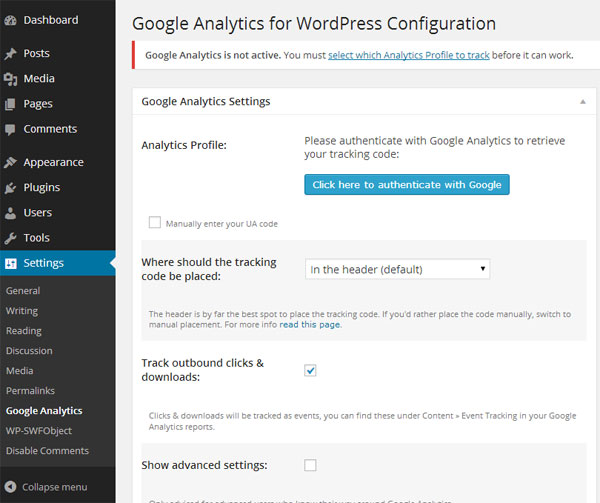
Use Google Analytics for WordPress Plugin
Google Analytics for WordPress plugin is a great tool to easily implement GA on your WordPress website. Simply search for the plugin from the search box within the Plugins tab in your WordPress Dashboard . Download and Activate the “Google Analytics for WordPress” plugin. After the activation process, go to Dashboards’ Settings menu and select “Google Analytics”. Click the button labeled “Click here to authenticate with Google” which will direct you to an authorization page to grant permission for the plugin to use your Google Analytics account. Agree to it until authentication is successfully completed.
You need to choose Allow access, and that’s it. You’ve set up Google Analytics for your WordPress website. After a few days, log in to your Google Analytics account, select the “Reporting tab” and start diving into the data to understand your visitors actions.
When you review the data gathered by Google Analytics, you’ll have better insights allowing you to make better decisions related to your site.
This is essential for your marketing strategy.
Any questions, just post them in the comments.