WordPress is an amazing platform, but it’s out-of-the-box default settings need to be be configured.
Therefore, you should run through these 10 steps after installing WordPress on your server.
By completing this task list, you’ll remove unnecessary components and properly configure the default settings to ensure your site is safer and – frankly – less dumb.
I recommend performing these steps before you install a theme. Let’s begin.
1. Delete Admin User
There is no bigger threat to your website security than leaving the primary username as ‘admin‘.
Every hacker and bot-net knows that the default WordPress username is admin. Grandma may even know this!
Chances are that you’ve left the primary username as the default during the WordPress installation, so go right now and create a new admin account with a super-strong password.
Then delete the admin user and you’ll be much safer from brute force attacks that target such vulnerable installations and succeed quite easily.
2. Delete Sample Post & Page
Nothing looks more unprofessional than Googling a company only to find their top link is ‘Sample Page‘.
These pieces of default content are there only as placeholders so you know the site isn’t broken upon initial installation. It’s just filler for the void.
However, since you’re about to fill your site with some awesome content, delete these useless posts and pages and let your words shine through to Google.
3. Change Site Title & Tagline
I lied. There is something more unprofessional than Googling a company only to find ‘Sample Page‘. It’s Googling a company only to find ‘Just Another WordPress Site‘ as the tagline. You’d be surprised how many sites are out there with this tagline still.
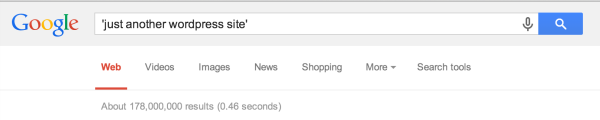
If the sight of a staggering 178,000,000 mistakes isn’t enough to make you cringe, I really don’t know what will. Head on over to Settings > General and change it to something meaningful!
4. Activate Akismet
Akismet is really the best plugin, ever. It will actively search every comment on any Akismet powered site to check if a new comment is spam. Most are!
It brightens my day to see the number of spam comments it captures overnight, but saddens me that most websites I investigate have it deactivated or even deleted – especially because the only barrier to entry is an account setup.
For most of you, an Akismet API key will be free or at most $5, which I find quite worth it in light of the ever-growing stockpile of spam comments I collect. It is truly worth the moment of time necessary for setting up the API key.
5. Remove Default Widgets
No WordPress site is complete without a few widgets to liven up your sidebar.
Unfortunately, the default installation of WordPress fills your sidebar with six widgets you usually don’t need. Depending on the theme you’ve installed, these widgets may load in the header or sidebar, breaking the website’s pretty layout.
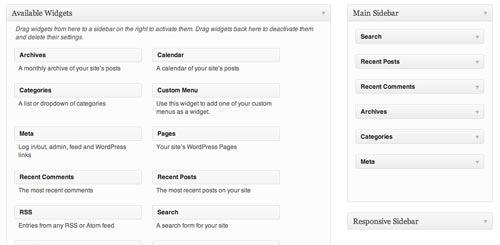
The Search, Recent Posts, Recent Comments, Archives, Categories, and Meta widgets are nice to have so your theme doesn’t look empty, but you’ll want to replace them with more relevant widgets in more appropriate widget zones.
Remove the widgets and add your own in Appearance > Widgets. You’ll find the default widgets within the first widget zone.
6. Delete Hello Dolly
Created by Matt Mullenweg, cofounder of WordPress, Hello Dolly is one of the two default plugins that come with WordPress.
It’s only purpose is to display a quote from Hello Dolly at the top of your WordPress Admin screens. If you like the quotes, by all means keep it, but not only has it not been updated since 02/2012, but it may conflict with other plugins and themes as well. I’m no fan of plugin clutter so my recommendation is to remove it after install.
7. Activate Pretty Permalinks
By default, WordPress permalinks are ugly. They look like “www.wordpress.com/?p=123” which is not good for SEO or for people wondering where they are on your site.
Google looks for keywords on your webpages to identify what content is there and one of the key sources is your URL.
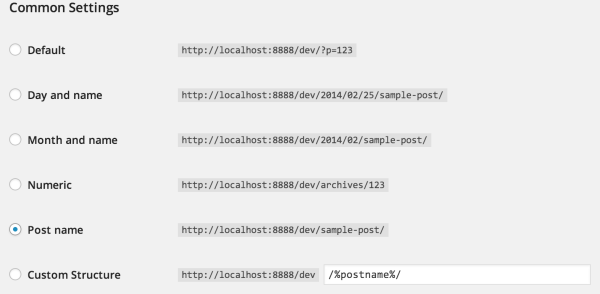
Unless you want to rank for /?p=123, you should change your Settings > Permalinks to the Post Name option so your permalinks will be human-like and google-friendly.
8. Install Limit Login Attempts
As I mentioned before, WordPress installations are prone to brute force attacks. Besides deleting the ‘Admin’ user, another way to fend off robots from attempting thousands of usernames and passwords is to install the Limit Login Attempts plugin.
It does exactly what you think. If you fail at entering your password 5 times, the plugin will lock you out of the login page for 30 minutes. You can adjust these numbers in the plugin settings, so feel free to lock bots out for days. Just a warning, you might also accidentally lock yourself out if you forget your password, so be careful with setting to strict a punishment for failed logins.
9. Enable Search Engine Visibility
When installing WordPress, it allows you to disable search engine indexing just in case your site is not ready yet. However, due to it’s relatively inconspicuous location in the settings, most people who have disabled it during initial installation may forget to enable it again.
This leaves their website blocked completely disallowing Google from indexing your posts and pages. Double check that you’ve enabled search engine visibility by navigating to the bottom of Settings > Reading.
10. Write a Blog Post
Before you install that beautiful premium theme you bought, it’s important to have content to showcase on it. Whether you’re starting your first blog or just the next one, it’s important to write first. People will leave your site if there is not any worthwhile content, so hit the publish button before you start searching for free themes and plugins.
What are your first steps after installing WordPress? Did I miss any initial steps?
Undoubtedly, the above mention points are worth doing after installing any new WordPress blog but you forget to mention one point, i.e., Install “W3 Total Cache” Plugin to make your site loads faster.
Well, thanks for the post :D